 aster
at Arms
aster
at Arms
The Effects of Weapons against Naval Targets - by Jan "Sirius" Klingele
This version is current as of April 13th, 1997
Foreword by Tim Wisseman, the creator of VGA Planets.
I consider "Master at Arms" by Jan Klingele a very cool and much need addition to my bare bones documentation of VGA Planets. This paper describes many aspects of combat much more clearly and in more depth than anything I have written to date.
I am very glad that VGA Planets fans are putting effort into describing the game, since I really do not have the time and energy myself to do so. I have been putting every spare time in to continue the work on VGA Planets version 4.
"Master at Arms" is very good. Even I have found new information about details I had forgotten or never thought out completely. When I was asked to verify this paper, I have found nothing inaccurate in it.
I highly recommend "Master at Arms" to every devoted player of VGA Planets.
Tim Wisseman
North Fork, April 97
Preface by the Author
I hope that you as my much appreciated reader will enjoy this paper and that your future battle tactics in VGA Planets will benefit from the insights you (hopefully) can gain from it.
I like to thank here especially my "Beta-readers" Timo Kreike, Christopher Holz, Ocie Hudson and James Rock, who helped me to improve my paper. A big thank you also to Tim Wisseman for creating a wonderful game and for answering some of my impertinent questions, when I was just not satisfied with the answers I had gotten previously.
Jan Klingele
Stuttgart, April 1997
Well, you have fought a couple of battles in VGA Planets and have noticed the effects of your weapons on enemy targets and what their weapons do to your ships. You have probably noticed that the better (more expensive) weapons do more damage than the cheaper ones, that torpedoes seem to more efficient than beam weapons and that you need a lot of torpedo armed ships to destroy those heavy fighter carriers. But do you really know how weapons work? Are you using the right weapons?
Every time you design and build a new capital ship, you face the question: How much more damage will the high tech weapons do than their cheaper varieties? Are they really worth their price tag? The Dreadlord Battle Manual by Ramutis Giliauskas (which by the way is an excellent source of information for the serious VGA Planets player) states the following about weapons: "There are two primary theories to weapons. One is to use the most powerful weapon you can (ex. Mark 8), and the other is to use the most efficient weapon (ex. Mark 4). The best solution is a combination of both. The reasoning behind the biggest BANG theory is that if your ship survives because you spent more on weapons, then the extra money was worth it. The reasoning behind the most efficient weapon theory is that by using cheaper weapons, you can produce so many more ships that it's worth losing a few more battles. The best solution has to be tailored to your particular circumstances (enemy, abundance of minerals, abundance of mega-credits, race) as well as to your playing style."
This is very true, but it leads immediately to two questions:
1. How is BANG (power of a weapon) translated into damage to the target?
2. What are the most efficient weapons?
 Tim Wisseman’s
documentation for Host 3.22 (which is the same as for WinPlan 3.52) tells us:
Tim Wisseman’s
documentation for Host 3.22 (which is the same as for WinPlan 3.52) tells us:
- The strength of the shields and the ship's armor is determined by the mass of the ship's hull.
- The mass of cargo, fuel, weapons and engines does not count toward stronger shields.
- The more massive a ship the stronger the shields are.
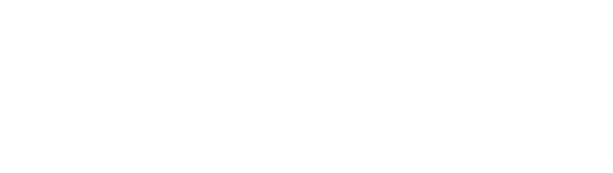
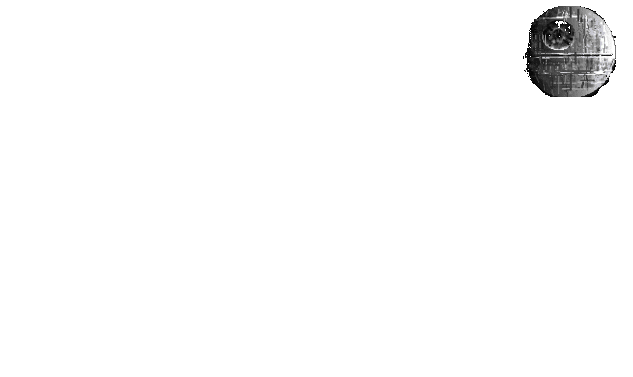
- Engine Shield Bonus: The power from higher tech engines increases the shield power of the ship. How much? At 100%, a ship with transwarp engines fights like a ship that is 300 kt more massive. The cost of one engine is added to the combat mass of the ship to take in to account of the effect of the higher tech engines powering the shields. This shield bonus is based on the tech of the engines and not the number of engines on the ship. The engine tech does not effect the charge rate of the weapons. The shield bonus does not apply to ships attacking planets. The engine tech shield bonus rate is set by the host.
- Amount of damage done to a ship decreases as the mass of the ships hull increases.
- Fighters tend to do more damage to larger ships than torpedoes.
- Beam weapon banks with more than 60% energy will fire at enemy fighters.
- The tech of weapons does not effect the rate of weapon recharge.
- Torpedoes and beam weapons tend to do more damage to smaller ships than fighters.
- All torpedoes have a 35% chance of missing their target.
- The percentage of energy lost from a shield that is hit by enemy fire follows the
formula:
LOSS% = Tetawatts * (80 / (hull_mass + 1 )) - The percentage of damage done to a ship's hull follows the formula:
DAMAGE DONE % = Tetawatts(E) * ( 80 / (hull_mass + 1) )
CREW KILLED = Tetawatts(K) * ( 80 / (hull_mass + 1) )
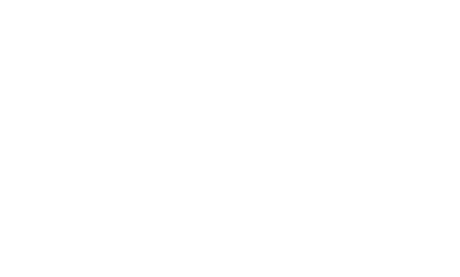
The "Tetawatts" represent the rating of the weapons, either explosive (E) or killing (K) power. For our purposes only the numerical value of this rating is important. The unit "Tetawatts" is difficult to understand for me: probably it is to be supposed to read "Terawatt" (which is 1012 Watt), but the WinPlan version uses "gw" as an abbreviation, which probably should be "GW", which stands for "Gigawatt" (109 Watt). But then the energy of weapons or their destructive work should be measured in Tera- or Giga-Joule and not in Watt, which is the measurement of performance (Energy divided by time).
In any case, the numerical values are set in the files "beamspec.dat" and "torpspec.dat" and are displayed in WinPlan, when you build these ship components. The standard values are:
3. First doubts: Comparison with standard battle doctrine
 So now we can calculate
the exact damage all these weapons will inflict onto a hostile target, can we not? Well,
if you try it, you will find that it just does not work! But before you start doing all
sorts of test battles, just sit back and think a little bit. If these above formulas were
true, why would fighters become so efficient against heavy ships?
So now we can calculate
the exact damage all these weapons will inflict onto a hostile target, can we not? Well,
if you try it, you will find that it just does not work! But before you start doing all
sorts of test battles, just sit back and think a little bit. If these above formulas were
true, why would fighters become so efficient against heavy ships?
And there is another effect, which already the Dreadlord Battle Manual observed: "As a general rule torpedoes are more effective at destroying the shields of a ship than causing hull damage." Several experienced players suggest, based on the same observation, that you should use torpedoes to drop the shields of larger opponents followed by a fighter carrier to destroy the opponent’s hull. Thomas Voigt for example recommends Crystalline players: "Use a Diamond Flame to drop the shields of a big carrier and kill it with a Crystal Thunder." (1) Or Richard Nadolny advises the Cyborg player: "While more expensive than the Biocide because of the torp tubes, the Annihilation is important for taking out the shields on those big enemy battleships so the Biocides can finish them off." (2)
In fact the obvious differences between the effects of fighters and torpedoes are one of the most important cornerstones for a successful battle tactic in VGA Planets. But there is nothing in Tim Wisseman’s documentation and his formulas, which would allow these effects. So Tim’s documentation about the effects of weapons is at least partially wrong!(3)
I have tried in many test fights to find out what is really going on. I have used the WinPlan battlesimulator (3.5x) a lot for this (most of the battle behavior is determined by the VCR (Video Combat Recorder) program and has therefore not changed between the different host versions), but I have also looked at the DOS version (3.0) and have checked my findings with the new host versions (up to 3.22.014). All my observations and conclusions are valid only for the original host program by Tim Wisseman. I have never played a game of VGA Planets with PHost and can therefore make no comments about weapons in a PHost environment.
When I had finished my paper Chris Holz, to whom Tim Wisseman has given the source code of the VCR program on a confidential basis, verified my findings. By comparing my empirical results with his theoretical interpretation of the VCR code he was able to confirm my work in most cases. A few deviations remain that are probably caused by the way the random numbers are generated in Tim Wisseman’s programs and by my statistical problems to measure all those random events correctly.(4) These deviations are clearly indicated throughout my text.
From my test results I was able to formulate the following observations for the effects of weapons. Although I included all available weapon systems and many different ship hulls in my tests, it is still possible that I missed some special cases, which behave differently than my projections. Please let me know, if you find any case, where my hypotheses are not applicable.
- The Engine Shield Bonus should be called Engine Defense Bonus, because it affects both the strength of the shield and (once the shield is gone) the resistance of the hull against damage and crew loss. When I speak about mass in the rest of this article I shall always refer to the effective battle mass, which is the sum of the hull mass plus the Engine Defense Bonus plus any applicable bonus mass.
- If the Fed Crew Bonus is enabled in the Host settings, then the battle mass of ships with a Fed crew is increased by a 50 kt bonus mass. This means that Fed ships appear to be 50 kt heavier in battles than they are actually, which makes them more resistant against the impact of enemy weapons.
- Since there is an imbalance between the chances of the ship on the left side and the ship on the right side of the VCR in battles with a fighter carrier on the left side, Tim Wisseman has chosen to fix this imbalance by giving the ship on the right side (which has the disadvantage) a 60% chance to get a bonus mass of 360 kt added to her battle mass, if the ship is heavier than 140 kt (including the Engine Defense, but not the Fed Crew Bonus mass). This random event can distort carrier battles significantly.(5)
- There is no influence of the range over which a weapon is fired on the impact (shield loss, hull damage or crew loss) caused by one hit of the weapon. The graphical display of the strength of the weapon system in the DOS version 3.0, which shows a relation between weapon power and distance, is wrong or at least highly misleading, although it looks nice.
- The formulas for beam weapons and torpedoes are different. In general torpedoes inflict
double the damage they are supposed to. The torpedo formulas are also valid for fighters
(although fighters fire beams themselves). We shall look into these formulas now in
detail.(6)
5. The impact of torpedoes and fighters
We start with torpedoes and fighters, since these weapon systems are typically more
important to determine the outcome of a battle than beams.
- Against shields
Note that there are two differences to Tim’s documented formula. Firstly the multiplier is 160 instead of 80, which doubles the effectiveness of all torpedoes, and secondly, the result is increased by one, which means that all torpedoes will reduce the shields - even of the biggest ships - at least by one percentage point, a very significant fact.

- Damage to Hull

(Rounded means that this expression has to be rounded to the nearest integer.)
This is a very important change to the formula documented by Tim. Basically the same calculation (with the doubled effect) as for the shield loss is used, but the rounded result is then (after multiplication by 80) divided a second time by the battle mass. Therefore the protection of the battle mass against damage to the hull is squared. The relationship between mass and damage is no longer inversely proportional, but inversely quadratic. This is the reason, why heavy ships take so little damage from torpedoes. The addition of one to the end result however guarantees, that every torpedo and also all fighters will inflict at least one percentage point of damage per hit.
- Crew killed

The effect against crew members is doubled. Otherwise the formula follows the documentation: there is no minimum of one killed crew member per hit and no quadratic protection from higher mass.
 The special feature of beam weapons is that they need a relatively long time
to recharge and will fire even when only partially loaded. Typically beam weapons fire
randomly with a charge level between 50% and 54% if in range to the target. The
documentation mentions a required energy level of 60%, but that is not correct. Beam
weapons that are not fully loaded will do less than full damage.
The special feature of beam weapons is that they need a relatively long time
to recharge and will fire even when only partially loaded. Typically beam weapons fire
randomly with a charge level between 50% and 54% if in range to the target. The
documentation mentions a required energy level of 60%, but that is not correct. Beam
weapons that are not fully loaded will do less than full damage.
- Against shields

(Rounded means that this expression has to be rounded to the nearest integer.)
Since the result is increased by one, all beam weapons will always reduce the shields - even of the biggest ships - by at least one percentage point.
- Damage to hull

(Rounded means that these expressions have to be rounded to the nearest integers.)
As for torpedoes, the protection of the battle mass against damage to the hull is squared. The relationship between mass and damage is no longer inversely proportional, but inversely quadratic. While the effect of beam weapons is not doubled, the addition of one to the end result guarantees here also, that every firing beam weapon will inflict at least one percentage point of damage.
- Crew killed
(Rounded means that this expression has to be rounded to the nearest integer.)

Hard to believe, but true. In this case, Tim’s documented formula works! No increased weapon effect, no minimum of one killed crew member per hit and no quadratic protection from higher mass.
Tim’s formula works also for Privateers perfectly in this case. The number of crew members killed onboard the target of Privateer beam weapons is three times the standard value (before the final rounding). Privateers receive no "kill bonus" for the beams of their fighters and also no "kill bonus" for their torpedo hits.
(Rounded means that this expression has to be rounded to the nearest integer.)

7. The defensive effect of battle mass
- The impact of beams and torpedoes
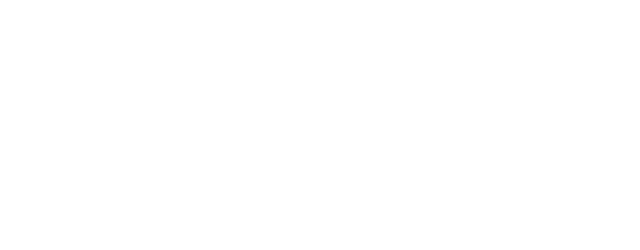
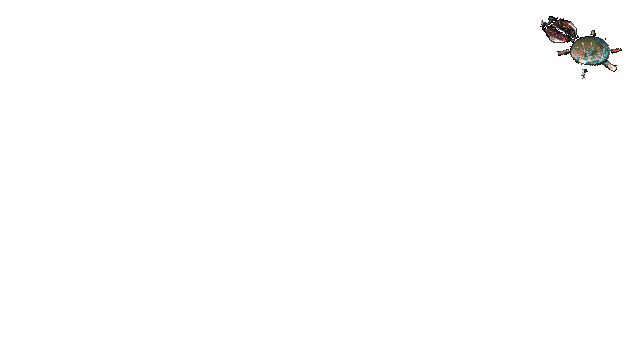
 Well, I think we had enough formulas so far. So let’s fire some weapons
against a target ship! We start by picking a typical medium size ship, the Crystalline
Emerald with a hull of 180 kt and no Engine Defense Bonus.(7)
The following table shows the shield loss (in percentage points), the damage to the
hull (in percentage points) and the loss of crew members (in men) caused by one hit of the
indicated weapon.(8)
Well, I think we had enough formulas so far. So let’s fire some weapons
against a target ship! We start by picking a typical medium size ship, the Crystalline
Emerald with a hull of 180 kt and no Engine Defense Bonus.(7)
The following table shows the shield loss (in percentage points), the damage to the
hull (in percentage points) and the loss of crew members (in men) caused by one hit of the
indicated weapon.(8)
Before we continue with heavier ships, let’s have a second look at beam weapons when they refire as soon as the charge level allows it. The following table shows the effect beam weapons have against a 180 kt Crystalline Emerald and a 120 kt Crystalline Ruby (9) in a close up fight
In the case that there is more than one value, the first value is the minimal effect the weapon has when refiring (typically at a charge level close to 50%) and the last value is the maximum effect I have observed frequently (at charge levels of about 54%). (10) I have included the case of the Ruby to show that these random variations can be even larger than a difference of 1 for lighter ships. We can see that the ship has become much more resistant against enemy fire. It takes considerably more hits of any kind of weapon to destroy the ship, but the high tech weapons still do the job much faster.

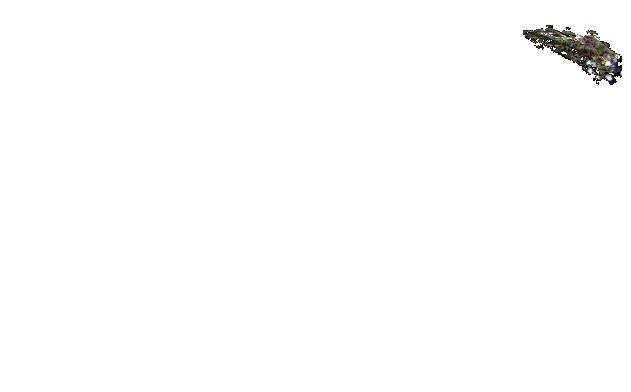
Of course, the nearly 200 kt increase in battle mass helps the ship to absorb the weapon impact even better. We still see a clear differentiation in the effect of weapons against shields, but less against the hull. There is for example no difference between the damage Mark III, Mark IV, Mark V or Mark VI torpedoes inflict on the hull of the Rush.
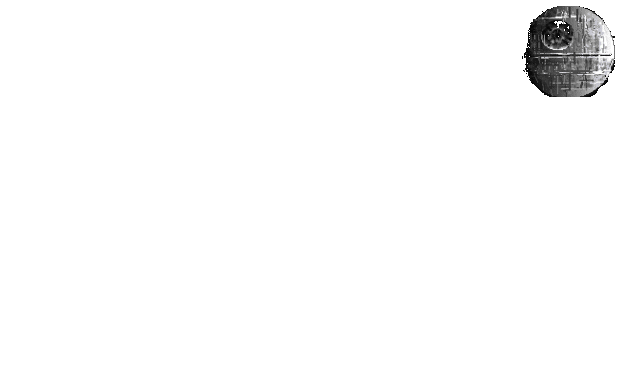
The trend continues: the ship gets tougher, high tech weapons still excel against shields, while no beam weapon does more than a single percentage point of damage to the hull, and even Mark VIIIs do only double the damage of a Mark I.
I think you got the message. The Gorbie is very difficult to destroy unless you can launch lots of fighters or several ships against her. High tech torpedoes still help to bring down the shields faster and you are going to need the speed you get from the extra punch of expensive torpedoes, because no torpedo armed ship is going to live long against a fully stocked Gorbie. High tech beams could help to bring down the shields in theory, but in practice they will fire mainly against incoming fighters (and when firing after a partial recharge even Heavy Phasers are good for only 2% shield loss). After the shields are down, every weapon has exactly the same effect on the Gorbie’s hull, there is no additional hull damage done by Mark VIIIs compared to by Mark Is or by Heavy Phasers compared to by Lasers.
- The impact of fighters
You have probably noted that Fighters inflicted 2% of shield loss and hull damage on the Emerald without Engine Defense Bonus, but only 1% of impact to the heavier ships. Since Fighters are used by all planets and many ships, they warrant a closer look. The following table shows the effect of a single fighter beam against ships with different battle masses.
I have omitted the masses between 10 kt and 30 kt, because only the Neutronic Fuel Carrier can have these battle masses (with different classes of engines and different settings of the Engine Defense Bonus) and that is really not interesting, since Neutronic Fuel Carriers cannot shoot back and a single fighter will always win against them.
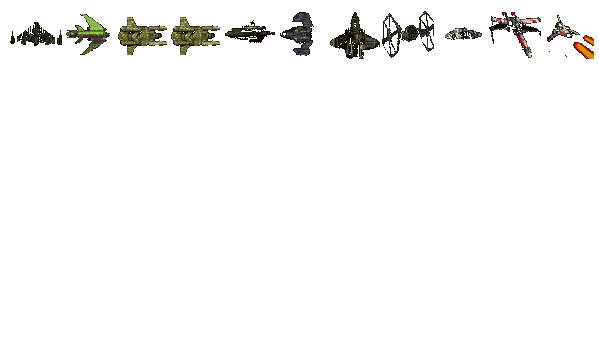
The important point here is that a fighter beam will do the same amount damage for all ships above 320 kt battle mass, no matter how massive the ship is. While the effectiveness of beams and torpedoes decreases significantly with higher masses, the effectiveness of fighters stays the same above 320 kt, which makes them the prime weapon against large targets.
Ships below 320 kt mass are extremely poor combatants against fighters, since the impact of the fighters’ hits is at least doubled. Try to avoid battles with these light ships against fighters unless the ship’s beam weapons (and fighters) can pretty much hold all fighters off!
This also very important for planets: If you expect an attack by a carrier against one of your planets, then put enough defense posts on the surface and on the starbase to reach a battle mass of 320 kt! Going from 319 to 320 kt battle mass is a tremendous increase in toughness for the defending planet (11).
8. The timing of weapon systems
So far we were only concerned with how much effect the weapons have with a single hit. But in battle it is of at least equal importance how often and how fast the weapon systems will be able to fire.
There are random elements in the timing sequence of all weapon systems and in fact, the random outcome of battles between roughly equivalent opponents is a function of three important random effects: the timing of weapons, the hitting or missing of torpedoes and the number of target locks that fighters get on other fighters.
- Torpedo launchers
All torpedo tubes are loaded at the beginning of a battle, unless the shields of the ship are not at full strength, and will start firing at a distance of 30000 kellicams (this distance is reached 140 microns after the beginning of a battle between two ships).
Torpedo tubes reload and refire at a random time interval between 30 and 42 microns, where the probability of a faster reload and refire increases with the tech level of the torpedo (12). Typical average times needed to fire again are:
Note that all numbers are rounded, because the small differences between some of the launcher types are difficult to measure exactly. The increased reloading speed for high tech torpedo tubes can make an important difference in prolonged battles. In a battle between two Annihilation Class torpedo armed ships (1260 kt battle mass with full Engine Defense Bonus), an Annihilation with Mark VIIs will be able to fire about two more full volleys of torpedoes than an Annihilation equipped with Mark I launchers. Against a large fighter carrier however, even an Annihilation is probably not going to live long enough to justify the really expensive torpedo launchers, if cheaper (slower) launchers do the same damage per hit.
All torpedo types have the same probability of about a third to miss their target. Chris Holz has reported (and Tim Wisseman has confirmed later on) that the theoretical analysis of the VCR code indicates that 34% of all torpedoes fail to hit their target and not 35% as the original documentation says.
- Beam weapons
Beam weapons are fully charged at the beginning of a battle as long as the shield power is at 100%, otherwise they are not charged at all. Beam weapons need about 200 microns to recharge fully. The charging time does not depend on the tech level of the beam weapon. If the enemy ship is within the firing range of 20000 kellicams, beams will refire with a 50% or higher energy load level after approximately 100 microns, although the cycle time varies randomly in a typical range from about 90 to 110 microns.
According to Chris Holz’s interpretation of the VCR code beams have a 50% chance to recharge one percentage point every micron. The theoretical fastest time to refire would be 50 microns, but this is very unlikely. As soon as a beam is sufficiently charged, it has a 30% chance per micron to actually fire against a ship or planet. Most beams are fired in the next few microns after the refiring level has been reached, but occasionally the firing is delayed quite long. I could even observe battles, where a beam recharged nearly to full strength before refiring.
Beam weapons need about 3 times longer to partially recharge than a good torpedo launcher to reload. This means that a beam weapon will deliver only between a half and an eighth of the amount of damage in the same time than a torpedo launcher of equivalent rating. The relation is about 1:2, if the target is so big, that all weapons do only one percent of damage and only the firing speed and the fact, that a third of the torpedoes miss their target, count. If the target is small, then the ratio goes up to approximately 1:8, because torpedoes do double the damage than beams, but miss a third of the time, because beams do only half of the damage since they recharge only approximately halfway and because beams fire at a third of the speed of torpedoes.
- Fighters
The launch of a fighter is also a random event, but on an average every fighter bay will launch a fighter every 22 microns or about 0.045 fighters per micron (13). The more fighter bays a carrier has, the faster she can launch her fighters. You can see the speed of the launch in a VCR from the angle of the line that the fighters form, when they are launched at the beginning of a battle: the steeper the line, the faster the launch.
There is a limit of 19 fighters for every side as the maximum number of fighters that can be spaceborn at the same time. A carrier will stop launching fighters as soon as she has already 19 fighters flying until either a fighter is shot down or has returned to the carrier and is put back on board. A carrier will also never launch more than one fighter in the same micron.
The Solar Federation can (depending on the host settings) enjoy a special Fed Crew Bonus, which gives Fed carriers not only two additional fighter bays, as it has been stated previously, but three additional bays. Tim Wisseman has also confirmed this in a conference on CompuServe. In contrast to the documentation, the additional fighter bays are given to Fed carriers even if they have already ten bays, which brings these ships up to a launch capacity of thirteen fighter bays.
After fighters have been launched, they start immediately to travel towards the enemy ship. If they are not destroyed before getting close to the enemy, they fire several beam shots and turn around to travel back to their own carrier. Fighters fly at a speed of 400 kellicams per micron (k/m). Since ships move with a speed of 100 k/m, fighters approach them with a relative speed of 500 k/m. Stationary planets are approached with 400 k/m. The time required for a full round-trip depends therefore on the distance between the launching carrier and the target.
At the beginning of a ship-to-ship-battle, when fighters are launched at maximum distance, they need about 118 microns to fly the distance to the enemy ship and another 71 microns to return to their carrier. Once the fighters get - after 111 microns - close to the enemy ship they fire usually seven, occasionally six, shots against this ship. Launched at maximum distance fighters can fire an average of 6.8 shots in 189 microns or 0.036 shots per micron.
As the battle continues, the two ships approach each other and the fighters need decreasingly less time to fly from one ship to the other and back. At the minimal distance of 3000 kellicams, where the two ships stop approaching each other (14), fighters can also fire their beams more often - nine times instead of seven - against the enemy. At this shortest possible distance the fighters need to be spaceborn only for an average 23 microns to complete a full round trip. They open fire after 3 microns and fire a beam shot every micron until they turn back 9 microns later to spend another 11 microns on the way back to their carrier. If launched at the minimum distance, fighters can fire 9 shots in 23 microns or 0.391 shots per micron.
While the impact of a single hit by a fighter stays the same, the ability to hit a target more often is greatly increased for fighters with a shorter range to the target. Especially when fighter bays have to delay the launch of additional fighters because the maximum of 19 spaceborn fighters is already reached, the shrinking distance between two ships in battle improves the cycle times of fighters vastly.
We shall now put everything together and see how ships with different weapon systems will perform in battle, how the weapon systems will interact with each other and what effects specific weapons will have during the different phases in battles between the most important ship types.
The sequence of a battle, where no fighters are involved, is pretty much forward and quite predictable. The two opponents will approach each other until they get into torpedo firing range. This occurs after 140 microns, when all torpedo tubes will be fired for the first time. Depending on the class of the torpedo launchers, this will happen nearly simultaneously or over a period of up to 10 microns. From then on the torpedo launchers will continue firing with average firing cycle times between 31 and 42 microns as a function of the torpedo class.
At 190 microns after the start of the battle, when typically two full volleys of torpedoes have already been fired, all beam weapons fire for the first time: fully charged and with full power. From this point of time onwards the beam weapons will refire at intervals of roughly 100 microns, although the individual timing may be randomly somewhat shorter or longer. When the beams fire for the second time at about 290 microns, good torpedo tubes have already fired five times.
Please keep in mind that beam weapons recharge only about halfway before refiring with about half strength and that about a third of all torpedoes will miss their target, while all beams will hit the opponent. Since the firing of beams and torpedoes is independent of each other, it is possible to calculate the amount of damage inflicted by each weapon system over time.
Now let us suppose we have a 100% Engine Defense Bonus and the following two ships fighting: a Diamond Flame with StarDrive1s, 6 Mark VIII Launchers and 10 Heavy Phasers against an Annihilation with Transwarps, 10 Mark VII Launchers and 10 X-Ray Lasers. The Diamond Flame’s weapon systems will deliver a shield loss of 6 * 0.170 % + 10 * 0.020 % = 1.22 % per micron and a hull damage of 6 * 0.043 % + 10 * 0.01 % = 0.358 % per micron. Therefore the Diamond Flame will need an average 82 microns to take the Annihilation’s shields down and another 279 microns to destroy her hull. The Annihilation on the other hand will pump out 10 * 0.383 % + 10 * 0.010 % = 3.93 % per micron shield loss and 10 * 0.106 % + 10 * 0.010 % = 1.16 % per micron hull damage. Therefore she needs 25 microns to lower the Flame’s shields and 86 microns to destroy her hull. In other words: In the average battle the Annihilation will destroy the Flame about 111 microns after weapon fire has started (250 microns after the start of the battle).
And yes, I am aware of the fact, that beams start firing later than the torpedoes. But this delay is mostly compensated in many cases by the fact, that the beams will be stronger on their first shot. Therefore the above calculation is not 100% precise, but typically quite a good approximation for all the random events that occur during battle.

With the introduction of fighters on one side, the situation becomes more complicated, because there is an interaction between the weapon systems. The beams of the non-fighter-side become anti-fighter guns and are typically no longer available to target the enemy’s carrier, at least as long as there are launched fighters available as targets.
Beam weapons can fire against incoming fighters already with a 40% charge level. The 60% energy level reported in the original documentation is not correct. To reload 40% of their capacity beams need on the average about 80 microns. When a beam weapon has the required energy level and at least one spaceborn fighter is present as a target, then the beam has a 20% chance to fire against one fighter. (15) On the average the corresponding 80% chance not to fire against a fighter leads to a delay of 3 microns before a fighter is shot down.
Only if the firing against a fighter is delayed so long, that the beam weapon has reached a charge level of 50% in the meantime, there is the possibility that the beam will fire against the capital ship and not against a fighter. The probability for this to occur is quite small, it is only in the area of 0.5%. So all beams will primarily fire against enemy fighters and not against the enemy ship. Only if there are no enemy fighters spaceborn when the charge level allows the refiring of a beam weapon, then it becomes likely that the beam will target the carrier
Since beams fire about every 83 microns, they are able to shoot down a little bit more than 0.012 fighters per micron. On the other hand fighter bays are able to launch 0.045 to 0.05 fighters per micron. Therefore it takes slightly more than 4 beams to shoot down all fighters which one bay can launch and about 8.5 beams to neutralize two fighter bays. Even a battleship with 10 beams cannot shoot down all fighters launched by a carrier with three or more bays. (16)
So the typical torpedo-ship-against-carrier-battle will involve fighters and torpedoes damaging their target as well as beam weapons fired against the non-carrier. The impact of the torpedoes and the carrier’s beams is of course the same as in a battle with torpedo ships only.
The effect of the fighters is limited by the fact, that only a maximum of 19 fighters can be spaceborn at the same time. The impact of the fighters is therefore not directly proportional to the number of fighter bays.
With a medium or larger carrier with 7 fighter bays or more and a torpedo ship with 10 beams, the battle sequence looks approximately like this:
Range (in microns)
0 - 20
10 fighters launched and immediately destroyed
10 - 48
19 fighters launched, and moving as a first wave towards the target
80 - 110
10 fighters destroyed by the recharged beams and relaunched as second wave
135 - 150
the remaining 9 fighters of the first wave reach the target and score about 60 to 63 hits against the shields
141 - 152
first volley of torpedoes fired
160 - 205
recharged beams fire at fighters mainly from the second wave, some target returning fighters, a third more dispersed wave of fighters is launched
167 - 190
second wave reaches the target, decimated by beam fire they score 40 to 70 hits
190 - 195
the carrier’s beams fire at the torpedo ship
172 - 194
second volley of torpedoes fired (depending on torpedo type)
203 - 230
third volley of torpedoes fired
212 -
the third, more dispersed wave of fighters reaches the target and scores the remaining hits
234 -
possibly a fourth volley torpedoes is commenced
234 - 250
the torpedo ship is destroyed
If the carrier has less fighter bays than about four bays plus the number of bays neutralized by the opponent’s beams, the fighter waves tend be more dispersed and the fight lasts longer. If the torpedo ship has fewer beams, then the fighter waves are more solid and contain more fighters, which makes the fight shorter. If the beams of the carrier are powerful, then the battle is shortened. If the carrier is relatively light, then the battle might end earlier due to the destruction of the carrier by torpedo hits. A higher Engine Defense Bonus typically helps the carrier more, since the impact of fighter hits is not reduced with an increased battle mass beyond the 320 kt limit, but the impact of torpedo hits is further reduced. This is especially notable for fights between battleships and lighter carriers like the Crystalline Thunder or the Fed Kittyhawk.
Adding more fighter bays to the carrier shows little effect. The fighters become launched slightly faster, but the maximum number of spaceborn fighters prevents this small speed increase to translate into a significantly higher weapon impact on the target. The only real difference that may happen is that some torpedoes fewer are fired in the fourth volley, because the fight is finished a few microns earlier. At long distances (and in a fight between a carrier and a non-carrier, one ship is always destroyed before the ships get really close to each other) a high number of fighter bays do not increase the effectiveness of the fighters significantly. A Virgo with 8 bays has therefore about the same impact than a Biocide with 10 bays.
To summarize the (large) carrier versus (large) torpedo ship battle: Within about 240 microns all the following happens: a) the torpedo ship will fire it’s beams three times and destroy the corresponding number of incoming fighters (maximum 30), b) the torpedo ship fires three to four volleys of torpedoes (maximum 30 to 40), c) the carrier’s beams fire once onto the torpedo ship and d) the fighters score enough hits to destroy the torpedo ship.
Against ships over 320 kt, all fighters of the carrier together deliver an average impact (shield loss and hull damage) in the area of 0.8 % per micron. If we consider only the time period after the first fighter has actually reached its target (at 135 microns after the beginning of the battle, when no other weapons have yet fired at capital targets) the average impact of the entire fighter weapon system is in the range of 1.7 to 2.0 % per micron.
In battles between two carriers, both sides are launching fighters into combat. This has the consequence, that all beam weapons are targeted against fighters and are generally not available to fire onto the enemy’s hull. The effect of the beam defense against fighters at long range is the same like in theone-carrier-battle: about 8.5 beams are necessary to neutralize two fighter bays.
The main difference to the one-carrier-battle is however, that the fighters will interact with the opponent’s fighters. Fighters can and will shoot down other fighters. Own fighters therefore form a defensive barrier against incoming enemy fighters.
A fighter has a chance of somewhat more than 5 % to shoot down another fighter that is passing it on the way towards the enemy. Fighters shoot only seldom against other fighters while they are returning to their own carrier. A single fighter may shoot down more than one other fighter and its ability to fire against the capital ship is not reduced by firing against enemy fighters. On first sight >5 % could seem to be a relatively small probability for a successful intercept of a fighter, but the odds for the destruction of a fighter are all cumulative with every pass that occurs between fighters.
The VCR code shows that the odds of >5% for a successful fighter intercept are the outcome of two combined random events. The first condition is that two opposing fighters have to meet at the exact same location (the same 100 kellicams interval) in space. Since fighters travel with a relative speed of 800 k/m towards each other, the chances of meeting at the same place are 1/8 or 12.5%. The second condition is to get an actual weapon lock onto a fighter at the same location. The probability for this is very close to 50%. Therefore the theoretical chances for a fighter intercept are 6.25% per fighter pass for each side.
The probability that an individual fighter will successfully pass all 19 enemy fighters is therefore only in the area of 35 %. If two waves of 19 fighters are launched against each other, on average 10.5 fighters are shot down and only 8.5 fighters survive to continue their flight towards the enemy. But the remaining 8.5 fighters will face another wave of enemy fighters and therefore suffer further losses, since the same number of fighters, which the enemy lost during the encounter, will be launched from the enemy carrier and will have to be passed before the enemy carrier can be reached. Combined with some anti-fighter defensive beam fire from the target carrier, it is unlikely that any fighter will make it through the defensive barrier formed by the enemy fighters as long as the enemy is able to maintain a sufficient number of fighters in the barrier.
The defensive or shielding effect of a fighter barrier is much larger than the effect of anti-fighter beam fire. Therefore only a few lucky fighters will occasionally succeed to break through the barrier and to reach the target capital ship. Usually a carrier suffers no or very little shield loss during the first phases of a battle against another carrier, where a torpedo ship would already receive substantial damage.
During the long range phase the number of fighter bays is not very important, as long as sufficient fighter bays are available to get eventually all 19 fighters (after losses due to beam fire) into space and to keep them there. As we shall see later, 7 fighter bays are usually sufficient to launch the 19 possible fighters even against 10 beams.
If one side is able to launch fighters clearly faster than the other side, then the battlezone between the fighters (where the two defensive barriers meet) will be pushed towards the slower launching carrier. In this case the additional time required for launching fighter by the slower side is compensated with additional travel time for the fighters of the faster side. Only if one side is so slow in launching fighters, that the enemy can destroy fighters faster than fighters can be relaunched (which occurs when there are only four bays or less), then the fighter barrier will collapse and the ship takes damage early on.
Basically what you are doing with the fighter barrier is to trade fighter for fighter. Since the odds in shooting a fighter down are symmetrical for both sides (17), the enemy gets a chance to shoot at one of your fighters every time you get a chance to shoot at him. Therefore you need to relaunch statistically one new fighter for every fighter you intercept. The fighter barrier is only effective, if you are able to keep close to 19 fighters in it, because the probability of fighters passing through the barrier increases with a smaller number of fighters considerably.
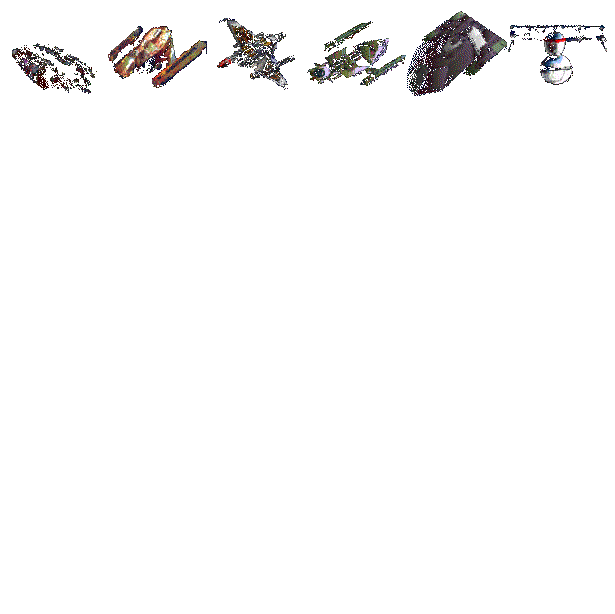
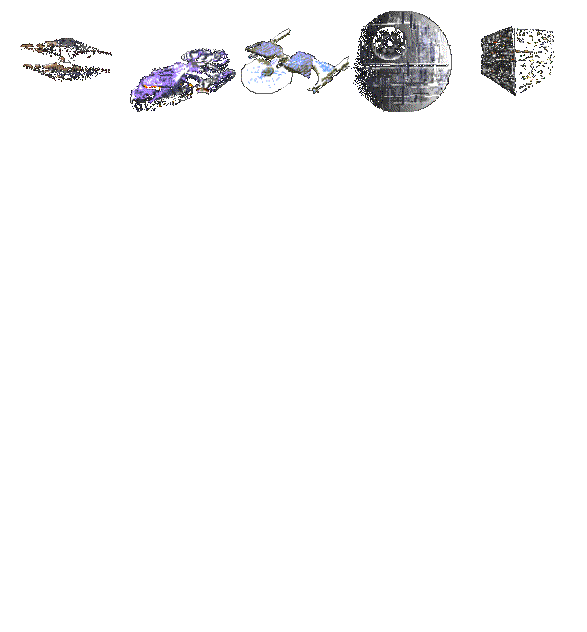
So the necessary condition to keep the fighter barrier up is to be able to keep all 19 fighters in space traveling towards the enemy, which becomes increasingly more difficult, as the distance to the enemy shrinks. Shorter travel times mean shorter times until the fighters become destroyed in the barrier, which requires shorter times to relaunch new fighters. The minimum distance down to which a carrier can successfully keep all her fighters constantly in space is therefore dependent on the number of fighter bays. The following two tables show for carriers of all different "sizes" the average minimum times that are required to launch 19 fighters. The distance that the fighters can travel towards the enemy during this time period is the minimum distance required for a full fighter barrier.
Most of the light carriers have generally not enough fighter bays to form an effective fighter barrier. Carriers with 3 or fewer fighter bays launch fighters so slowly, that they will never have the 19 possible fighters simultaneously in space. Carriers with 4 and 5 bays could theoretically have a full fighter barrier out, but by the time they could have launched all necessary fighters, the ships are already closer together than the necessary minimal distance, so that some fighters have already turned back before the last fighters are launched. In the first table only carriers with 6 fighter bays are effectively able to form a full fighter barrier, but not for very long and only if there are not too many beams on the enemy ship.
As you can see, the large carriers with many fighter bays have a considerable advantage in this field. All carriers with more than 6 bays can form a full fighter barrier and most of them can maintain the barrier for quite some time during the battle. With a little bit of luck the battle between two Fed Biocides will be so well balanced, that even after 225 to 230 microns the shields of both carriers will not have a single scratch, although each carrier will have lost already about 75 fighters in the intense zone of weapon energy between them. This shows clearly that commanders of ships like a Kittyhawk under Fed control or even an Instrumentality must never forget that their ships are severely hampered by their limited cargo space, since they may be out of fighters before they can even reach the enemy. So the first long range phase of a heavy-carrier-to-carrier-fight is distinguished by two facts: it is very expensive in fighters and there is hardly any weapon impact, even up to the moment in time when one of these carriers would have already almost completely destroyed a big torpedo ship.
Ultimately however, the distance between the two battling carriers will become so small, that even the most powerful carriers will not be able keep enough fighters in the barrier. Consequently more and more fighters will reach their targets and open fire onto the carriers, which are going to receive more and more damage as the distance shrinks further. After the minimum distance for the defensive barrier has been passed, the carriers will gradually have less fighters out and the effectiveness of the barrier is reduced down to the point that is shown in the tables under the heading "At 3200 kellicams:". This is the latest point of time when the two opposing carriers are still moving and shows the fighter barrier at it’s weakest stage.
At this distance fighters will be traveling only for about 10 microns towards the enemy and will be firing after 3 microns 6.8 times on the average. However they can be intercepted by enemy fighters only during the first 6 microns of their journey, since they will have passed the opposing carrier and therefore all defending fighters after 6 microns and fire their remaining shots from a position behind the enemy ship.
The effectiveness of the anti-fighter beam defense is reduced even further, because beams may target also fighters on the way back, when they have already fired all their shots. The average fighter shot down by the ship’s beams has fired 4.3 times against the ship, so that a hit by the defending beams prevents on the average 2.5 fighter hits.
The carrier tables show the number of fighters in the barrier at the 3200 kellicams distance, as well as the protection offered by the barrier, which is the number of shots per micron that are not fired against the ship because of the fighters shot down in the barrier. The figures for the equivalent protection by beam defense fire are also shown. If you deduct the two protection figures from the damage potential of the fighters launched by the opponent (number of fighters multiplied by 6.8 shots per fighter), you get the actual net impact (shield loss or hull damage) done by the enemy fighters. The net fighter impact for one side is a function of this side’s number of fighter bays, the other side’s number of fighter bays and the other side’s number of beams. The last line in the table shows the net fighter impact under the assumption, that two ships of the same class fight each other. This calculation requires of course, that both sides have sufficient fighters available and that both ships have a battle mass of at least 320 kt. (18)
At 3000 kellicams the situation changes drastically, since the two carriers will stop approaching each other. The opposing fighters are now all launched 3000 kellicams apart from each other, which is not a multiple of 400 kellicams. Because fighters move 400 kellicams every micron, they can never meet with hostile fighters at the same point of space and there are consequently no more dogfights between fighters. In other words: the defensive barrier collapses entirely.
Furthermore fighters have more time to shoot at the enemy carrier, since their target does not move anymore. Now they can fire nine times against it. The beam defense on the other hand becomes slightly more effective since the relative speed of approaching fighters is only 400 k/m instead of 500 k/m. The defending beams have therefore a bit more time to destroy incoming fighters before they have delivered all their shots. For every fighter destroyed by beam fire, an average of 3.1 fighter hits against the ship are prevented. As you can see from the carrier tables, the defensive effect of the beams is very small compared to the offensive power of the fighters at the 3000 kellicams battle distance. The tables show also for this case the damage potential of the launched fighters, the protection from damage by beam defensive fire and the net impact as the difference between the two figures.
Two points deserve special attention. The first and more important point is that the number of fighter bays makes a lot of difference in a close up fight. Carriers with a higher number of fighter bays have a very significant advantage. Especially heavy carriers with ten fighter bays (Biocide and Gorbie, but also Golem and Rush) become absolute deadly killers when they get thirteen bays under Fed control. Their ability to inflict per micron more than 5.2 percentage points of hull damage even on the largest ships is unmatched by any weapon system in the Echo Cluster. Not even the best defended ship with a Lizard crew can stand that kind of weapon power for long. (19)
The second interesting point is that you need about 11.5 beams to neutralize a single fighter bay at close distance, since the beam defense has become so ineffective against incoming fighters. It is likely that a ship with many beams facing an opponent with relatively few fighter bays will start targeting the enemy carrier with her beams frequently, since there are not always fighters in space available as targets. This will decrease the effectiveness of the anti-fighter fire by the beam weapon banks even further.
Since the number of beam weapons is more important at long distance (one fighter bay equals about four beams), while the number of fighter bays is more important at close distance (one fighter bay equals 11.5 beams), the overall effect is a mixture of the two components. It seems that in the entire fight as a rough average about 6 beam weapons more are needed to offset the advantage of one additional fighter bay. This explains, why a Rush (10 bays, 5 beams) or a Golem (10 bays, 6 beams) will generally win against a Virgo (8 bays, 10 beams).
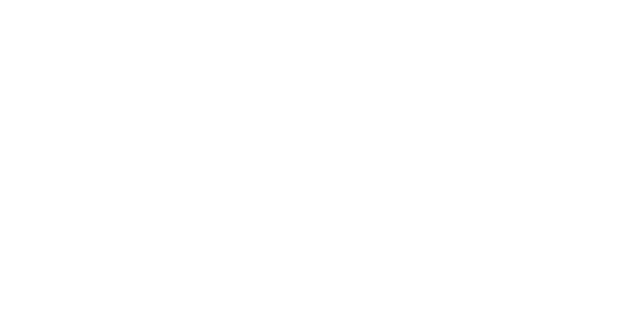
The following table shows the battle performance of the "Big Five Carriers" in the hands of their original owners (no Fed or Lizard combat bonuses). The numbers in the table are the average results of my experiments, where the two opponents had to fight for all possible random seeds (20) and then to switch places (between the left and the right side of the VCR) to fight again for all possible random seeds. The quality of the engines and of the beam weapons does not influence the battle outcome, because nearly all impact comes from fighter hits and all five ships are well above 320 kt battle mass. Since both the Biocide and the Gorbie have 10 bays and 10 beams, they are absolutely identical when fighting against carriers.
Although the probabilities of the important events are symmetrical for both sides, I have found a significant advantage for the carrier on the left side in many carrier-to-carrier-battles (much more than in battles with only one or without a carrier). Overall the left side enjoys often a better fighter intercept ratio and a slightly faster fighter launch speed. Tim Wisseman and Chris Holz have confirmed, that this discrepancy does not come from differences in the code of the VCR program between the two sides, but is the result of an unfortunate bias in the generation of the pseudo random number in the VCR program. For the "Big Five" the separate results for fighting on the left and on the right side are the following:
Tim Wisseman chose to overcome the left side advantage by giving the ship on the right hand side a 60% chance to receive a 360 kt additional bonus mass. Although this seems to be a significant increase in battle mass, the effect is very small, since there is hardly any beam fire against the capital ships in a major carrier-to-carrier-battle and all fighter hits have always the same impact no matter how much the target’s mass exceeds the 320 kt limit. (21)
The 360 kt bonus mass has a tremendous effect for carriers with a battle mass under 320 kt (like the Fed Kittyhawk without an Engine Defense Bonus), but it does not change anything for the Big Five Carriers at all and is therefore totally ineffective to reduce the imbalance. I am currently conducting some more research to find a more suitable way to overcome the asymmetry between ships on the left and the right side of the VCR display.

Planets and starbases fight basically like carriers. A maxed out starbase on a fully populated world with 366 planetary defense posts has 19 planetary plus 60 starbase fighters, 19 planetary plus 5 starbase fighter launch bays, 10 Heavy Phasers and a battle mass of 666 kt.
With more than 20 fighter bays, this maximum starbase is guaranteed to launch a fighter every micron, as long as the base has not 19 fighters out in space. This is even much faster than the launch speed of a Fed crewed Gorbie or Biocide. Such a starbase is a very powerful carrier, which is only hampered by its low storage capacity for fighters.
There are two important differences between a ship-to-ship- and a ship-to-planet-fight. The first difference is that there is no Engine Defense Bonus for ships attacking a planet. This makes ships with a hull mass of less than 320 kt vulnerable against the defending fighters. The second difference is that only the ship moves. Therefore the relative speed between the two targets is only 100 kellicams per micron (as opposed to 200 kellicams per micron in ship-to-ship-battles). The slower relative speed is compensated only partially by the somewhat smaller starting distance of 54’000 kellicams (at micron 0) between a ship and a planet as compared with the 58’000 kellicams starting distance between two ships.
In a battle between a torpedo ship and a starbase the ship needs much longer (280 microns) to get into torpedo firing range compared with the case when the torpedo ship is facing a carrier. Since the planet is able to launch fighters from the beginning of the battle on, the starbase fights better than a carrier of equivalent specifications against the torpedo ship. Where a heavy battleship with 10 torpedo tubes can fire 30 to 40 Mark VIIIs against a heavy carrier, the same battleship can fire only 20 to 30 Mark VIIIs against a full starbase before the ship is destroyed. Because the fighters have to travel longer towards their target, the battle lasts longer and the beam defense against the fighters has more time to shoot them down. The battleship can shoot down up to 40 fighters from a starbase, while she can shoot down a maximum of 30 fighters from a heavy carrier. Since the starbase fighters (which are not replaced after each battle) are shot down before the planetary fighters (which are automatically replaced), a starbase tends to run out of fighters quickly and can be destroyed already by a pair of battleships.
In a battle between a carrier and a starbase the immobility of the planet is even more important. Since the starbase does not move, all fighters from the base are launched at the same location in space and can all travel only to the exactly same 100 kellicams intervals all the way to the enemy, which are in distances of full multiples of 400 kellicams from the starbase.
The carrier on the other hand moves and launches her fighters randomly over all 100 kellicams intervals. Therefore only a quarter of the carrier’s fighter will be able to intercept the starbase’s fighters and are therefore likely to be overwhelmed. Since a fighter barrier trades on the average fighter for fighter it is likely that three quarters of the starbase fighters (after losses due to defensive fire by beam weapons) reach their target and fire against the carrier. The fighters from the carrier are in a similar situation: three quarters of them are not facing any kind of fighter barrier and can therefore (after losses to defending beams) open fire on the starbase.
Although both sides can keep up their fighter barriers longer, because the critical minimal distance would be reached at a much later point of time, and although the longer cycle times of the fighters result in less impact per micron by the entire fighter systems of both sides, the fighter barrier is so ineffective that both sides take damage early on. During a fight between a carrier and a starbase the slower relative speed between the two opponents leads to a faster, shorter lasting battle.
Therefore a maxed out starbase has a relatively good chance to win a battle against a heavy carrier, although the base has less than 80 fighters in total. This very different from a battle between two heavy carriers, where a carrier with only 80 fighters on board has absolutely no chance against a fully loaded heavy carrier.
The effectiveness of weapons in VGA Planets can be judged only against specific targets. You have to decide first which opponent you want to fight and then you can choose the best suited ships and arms for the task. As we have seen, the quality of the ship’s overall offensive strength can be expressed by a single figure: the average amount of time necessary to destroy the opponent. This figure can be calculated by taking into consideration: a) the impact of weapon hits, b) the timing and probability of weapon hits and c) the protective effects of the enemy’s weapons against fighter hits. The shorter the time, which your ship (or ships) needs to destroy the enemy, is in comparison to the time the opponent needs, the better your chances are to win the fight. And that is the aim why you are sending armed starships into battle: to destroy the enemy as quickly and efficiently as possible.
Since your resources are, especially at the beginning of a game, quite limited, you have to consider also the cost when you build new starships or order existing ships into battle. The best way to do this, is to compare the battle performance of your various ship designs with their requirements for your bottleneck resources. According to your specific situation, you may have a shortage of starbase capacity, mega-credits, one or several minerals, ship slots or priority build points. Optimize your usage of ships, so that you get the most effect in relation to what you have to spend of your most limited resource.
I hope that my pieces of information will help you to know better how to spend your resources, how to design your ships and how to fight.
Plan well! ... and then ...
All weapons: Open fire!
- In Gary Grothman’s FAQ
- In Ted York’s Warroom
- This is probably not very surprising, since, as Timo Kreike pointed out to me, "it is generally known that Tim’s docs are wrong at many subjects".
- Many of the tests were so time consuming that I could not conduct enough of them to obtain the necessary number of observations for a statistically significant result on a high confidence level.
- I shall come back to this point in chapter 9c.
- In all of the following formulas, the end result has to be rounded (up or down) to the nearest integer, because shield strength, damage level and number of crew member are displayed and stored only as integers in VGA Planets. I have omitted this final rounding to make the formulas easier to read.
- Since a Birdie Resolute has the same mass, it shows exactly the same results like an Emerald.
- All the numbers in the table have been found by experiments, but using my formulas yields the same results.
- Other ships with 120 kt mass like the Fed Banshee (without the Fed Crew Bonus!), the Lizard Saurian, the Cyborg Firecloud or the Robotic Cat’s Paw have of course the same resistance against weapons.
- Occasionally beams are charged even further before refiring. See also chapter 8b.
- The battle mass of a planet is 100 kt plus the number of planetary defense posts plus the number of starbase defense posts. The building of a starbase (without defense posts on the starbase) does not increase the battle mass of a planet. The DOS Informer program is wrong in this respect.
- The firing cycle for Mark I torpedoes is actually not a random process, they will fire after precisely 42 microns.
- The VCR code implies a theoretical launch speed of one fighter every 20 microns or 0.05 fighters per micron.
- Please note that the display of the WinPlan VCR for the minimal distance between two ships is wrong. It displays 3200 kellicams, although the true distance is only 3000 kellicams. Tim Wisseman has also confirmed the minimal distance to be 3000 kellicams. The display in the DOS version of the VCR program is correct.
- This is a theoretical figure from the VCR code. I was not able to test it.
- As long as the carrier has sufficient fighters on board. A Patriot, which can carry only 30 fighters, will always fight very poorly against a battleship with 10 beams, because she runs out of fighters soon.
- Chris Holz has found in the VCR source that the odds are actually 49.5% for the left and 50.5% for the right side to have a successful fighter intercept. This small difference does not seem to be relevant.
- The tables use a launch speed of 0.048 fighters per bay and micron and a fighter intercept probability of 6.0%. These values are a compromise between my empirical findings and the theoretical values.
- With the possible exception of the Serpent’s Venom, the Lizard king’s modified Merlin with 18 beams and 12 enhanced Hell Hammer torpedo tubes. See The Undead Hedgehog’s article "Final Conflict" in the forth issue of the Planeteer for the story about this fictional ship.
- The Host program uses only a certain range of random seeds that are passed to the VCR program.
- The 360 kt bonus mass is also given to torpedo ships on the right side that face a carrier. This is unfortunate, because in such a case there is only a small (if at all) imbalance between the left and the right side, but the effect of the increased mass is much more important, since all beams of the carrier shoot against the torpedo ship and not against fighters.