The Birdmen
A number of guides have already been written on the Birdmen, with some of them giving out some excellent advice to new players. If you’re looking for a powerhouse race that takes out anything in its path, or you’re just playing in your first few games, then you’d be better off going with the Robots, Rebels or Colonies to be honest.
However when played skilfully, the Birdmen are quite capable of producing outright wins against more powerful foes. One of the aforementioned guides describes the Birdmen as the weakest race in the game, which is blatantly incorrect, as there are several other races in the game with fewer advantages.
This guide presumes that the reader is already adept at getting around the game environment, and is quite familiar with the game mechanics and terminology. So if you’ve already got a number of games under your belt and you’re keen to understand the world of the Romulan race, then read on...
Initial GamePlan
Ok, presuming that you start with the usual SDSF and Swifty, contrary to other guides on the Birdmen your first ships should be two Large Deep Space Freighters - make that three if you’re in a tight cluster with a lot of nearby planets within 81 light years. Why the freighters? Because getting your nearby planets populated and cranking out the resources is far more important than reconnaissance in the first few turns. Also plan to build a Merlin as quickly as possible when minerals on non-homeworlds are set to ‘random normal’ or worse.
After the initial run of freighters, I tend to alternate between Swifties and LDSFs until I can build that Merlin, preferably before turn 15. As usual, send out your free ships that came in the first turn loaded with colonists to populate the nearest planets and beyond. Even at warp 6 they will normally populate a planet a turn initially (overdrive them to Warp 8 as required), thereby giving those first LDSFs plenty of work to get on with. Your LDSFs should drop 100 colonists per planet unless it has natives or a poor climate - use Echoview to work out the optimal number of clans to drop. As you deploy the clans, scoop up all the minerals for your return to base. Try to work in a circular pattern, so that after 4 to 5 turns, you don’t have a long journey back to your homeworld.
At this stage it’s highly tempting to build and send out your first Resolutes to go and harass one of your neighbours and put them on the back-foot. Avoid this temptation – your first priority must be to your economy, which means getting those colonists loaded onto freighters and expanding your empire quickly, even if this means your new Resolutes are temporarily used as cloaking freighters. You must keep those home fires burning at all costs, and this means keeping those starbases stocked with the minerals and cash they need. Whenever you feel the temptation for early skulduggery, just recall these four words – mind.your.own.business.
A number of guides talk about remaining hidden for as long as possible so as not to give away your homeworld location, or home cluster. This should apply for the first five turns only, and after that should be done only when it is convenient to do so. For example, say it’s turn ten and you want use your freighter to dump colonists on a nearby planet that is 140 light years away – normally requiring two hops. However if the planets are aligned so that to remain hidden you would require to take three hops over already populated planets, then you’re better to take the two hops and disguise the direction of travel of the freighter by making each leg less than 81 light years in distance. In doing so you’ve just saved 1 turn of travel on the freighter, but revealed your home cluster in the process. Regardless of what you might have read elsewhere, this really isn’t a big deal for the Birdmen for a number of reasons:
(a) You’ll generally only have two neighbours within detection range – one of which you’re likely to ally with
(b) They’ll be most likely concentrating on rapid expansion rather than invasion
(c) You’ll have advanced warning of their approach, as your Swifties will have populated most of the planets between you and them
(d) The other cloaking races have small cloaking ships which are only capable of taking down a starbase in significant numbers, and
(e) It’s only going to be a matter of time before they work out who they’re next to anyway, and after that it doesn’t take a rocket scientist to work out where the home cluster is
The Time For Diplomacy
Diplomacy is arguably the single most important element of the game. Unless you’re playing in a game that forbids the formation of alliances and non-aggression pacts, you should give some serious thought to forming at least a NAP with one of your neighbours as early as possible, if you haven’t done so already. This will establish a (theoretically) solid border, allowing you to expand rapidly in the opposite direction. In terms of deciding which of your neighbours to attack, consideration should be given to not only the race, but also the experience level of the neighbouring player. While the birdmen are able to go toe-to-toe with most other races, and quite often against two enemies on a common front, failure to establish a NAP or alliance with a neighbour in the early stages will undoubtedly make the situation much more difficult. Never be concerned about limiting your ability to expand by dividing the map, as you’re highly unlikely to completely take over your half by the time the game has ended.
By turn 12-15 your Swifties should now have found who your two closest neighbouring races are. Make the call on which one to form a border with and initiate the negotiations if they haven’t done so already. Keep in mind that the principle reason for forming the border to is give yourself a launching platform and direction for your campaign. It’s at this stage of the game that NAPs and alliances tend to be finalised, and this is one of the keys to your success. Move quickly to establish dialogue, even if you’ve inadvertently engaged in combat already – quite often some players are still agreeable to a border after significant losses on both sides, especially if they believe you have the upper hand. Failure to quickly establish your boundaries can mean one of your neighbours has already sliced up your part of the map and is planning the invasion.
Post-Diplomacy GamePlan
With your newly formed border in place, divert your Swifties towards your first intended victim. As they are unable to tow, it’s unlikely at this stage you’ll capture many freighters due to them being always on the move. The main job of your scouts is reconnaissance. The first of your Resolutes should start their raids around turn 20, but only as long as the freighters back in your home cluster are keeping up with the demands of the starbases. The aim here is just to put the enemy on the defensive, thereby moving him quickly from an expansion phase to a defensive phase. Expect to see large minefields deployed quickly to keep you at bay, and the production of heavy warships - this is a good thing, as it will slow him down economically as he makes the shift. Nestle a Swifty into a warpwell with mission set to minesweep in order to get a constant update on the state of the minefields, and start to pick off the most developed planets outside of any minefields with your Resolutes.
Finding and capturing the freighters at this point will be pivotal to preventing the building of warships – a good plan is to set your FC to that of the minefield, move in to the starbase with mission = super-spy (not cloak), then drag off the freighters into the warpwell as they arrive in. Just remember to change the FC of the towing ship to avoid it surrendering to the starbase before it moves, and set your waypoint greater than 81 light years away. Even if you manage to take out just a probe or small ship, this is the equivalent of handing a “miss one turn” card to the starbase. As additional reinforcements arrive in from your home cluster, where possible get them to bring in large quantities of torps for minelaying, however this should never be at the expense of ship production. In this phase your minefields have one purpose, and that is to reduce or eliminate any minefields he may put up in defence. Avoid putting your minefield up right in the middle of his cluster where it can be swept before it can perform its intended task, instead opt for off to one side.
After another ten to twenty turns he won’t be seeing the funny side of your antics, and may begin to miss the odd turn here and there as his score graph has been flat-lined for some time and enthusiasm for the game wanes. As this occurs, start to load up your colonists onto LDSFs and start heading them in his direction. Unless he’s bailed out of the game altogether, it’s advisable to planet-hop the freighters so as to not arouse suspicion.
Over time you should see a trend of a diminishing number of planets owned by your enemy, a decrease or flat-lining in the number of freighters they own, and an increase in the number of warships as the focus of production is shifted. Remember your aim at this stage is to destroy the enemy from an economic perspective, not a military one. You can also expect to see large warships being driven towards your cluster in order to try and reverse the situation, i.e. to put you on the back-foot. The planets lost along the way should be undeveloped and relatively devoid of fuel (you have been expanding around the outer edges of your border with your ally during this time, after all). It will take a few turns for the arrival of his warships onto your front door. Your Swifties can be used to re-take the planets back once his fleet has passed through, and use the Resolutes to cherry-pick the weaker ships out of his fleet by towing them off. Deployment of minefields will act like a toll-booth in space – he’ll most likely try to sweep them to avoid having the carriers go into battle damaged. The heavy carriers and warships may make it through to your cluster, but by this time you should have built a good number of disposable low-moly Darkwings (Mark 7’s, Disruptors, heavy nova drives). Once any counter-attack has been snuffed out, move the Darkwings and LDSFs in as part of the mop-up operation. If done correctly, you’ll have minimal loses in your fleet.
As you continue to expand, you should create a barren wasteland of planets behind you, with the occasional oasis planet (large fuel quantities guarded by a starbase and minefield). This scorched-earth tactic will make it difficult for the enemy to advance due to the lack of fuel, and also give them the feeling that they’re using their fleet to regain planets of little value (which only get quickly retaken by Swifties). If playing against the Fascists or Lizards, make sure you don’t rush the LDSFs in to populate the back end of this barren zone too quickly, or in other words, make this scorched-earth area a bit wider when playing against either of these races. Your battle front should consist of
(a) Swifties well in advance of the main pack providing recon, followed by
(b) Resolutes through the middle of the field, taking out small ships, freighters and planets
(c) Fearless Wings and White Falcons on the outskirts where they are unlikely to get involved in ship to ship combat,
(d) Darkwings providing the mop-up, and
(e) Large Deep Space freighters at the rear bringing in colonists and setting up bases
If the Resolutes, Fearless Wings or White Falcons find an enemy ship going the other way that they can’t handle on their own, allow it to slip through to the wasteland area behind, and leave it for the Darkwings to deal with later.
Combat Advantage
From a strategy perspective, the Birdmen require a skilled commander in order to be effective, as they lack the sheer firepower of the carrier races, the economic advantages of the Lizards and Feds, and the specialist abilities of the other races. However, the trade-off for all of this is one of the most powerful and valuable assets available, the ability to pick the fight. As the Birdman, you need to take the fight to the enemy, to be the instigator of the fight, and never the other way around. If placed in a situation where they’re put on the defensive, the Birdmen will either lose or diminish this one natural advantage they have. Therefore aggression is the key to survival. When you have the ability to fight or remain cloaked, you can effectively dictate the terms and conditions of the combat. This allows you to pick off the weaker ships in the fleet and dictate which ships fight, either by
· towing them out with, or to, an awaiting Darkwing,
· cloaked-intercept
· using friendly codes, Mission and PE to determine battle order
· completely draining the fuel out of damaged ships that can’t cloak
· or simply by taking them on where they stand with a more powerful ship.
Regardless of the technique, you should ensure that anytime you have to lose a ship in combat, you take out something significantly stronger in the process, or in other words, the only ships you should lose in combat are the sacrificial lambs. In a planned single ship versus single ship fight, you should always come out the victor. If not, then you either (a) should have remained cloaked and used a Darkwing instead, (b) should have brought a second ship along, or (c) something hasn’t gone quite as planned.
Finally, make sure you bring the right sacrificial lamb for the job. There’s no point losing a Darkwing when a Deth Specula could have reduced the enemy ship sufficiently. For instance in one game, I used two Swifties to reduce a starbase by 8 fighters – just enough for my Darkwing to survive in the same round, and as BANE would tell you, trading two dinky Swifties for a starbase is one heck of a deal.
Dirty Tactics
Two words – Guerrilla Warfare. The Birdmen are the guerrilla warfare masters of the Echo cluster, and that means playing dirty. We’re not talking about backstabbing an ally, or playing outside the spirit or mechanics of the game, but rather playing an enemy-infuriating game of cat-n-mouse. Think of the Birdmen as the chaos engine that drives the game. Principle tactics include:
· All combat should be opportunistic. If your enemy sends a probe, kill with a Swifty, if he then sends a destroyer, kill it with a Resolute, if he then sends a mid-sized carrier, use a Darkwing, and when he sends a heavy carrier, do the simulations and use a Deth Specula / Resolute + Darkwing combo, or a Darkwing + Darkwing combo. For every combat, make sure you go one better than your enemy. This is your key to winning. For approaching enemy fleets where the ships vary, use cloaked-intercept or towing to break them up. Never take on a fleet combo by putting up ship after ship after ship. Lastly, always bring more than enough ships to ensure victory, otherwise don’t fight. Fighting is your one advantage, and nobody else’s.
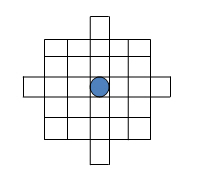
· Make sure you understand the warpwells around planets and how to use them, as they’re a great location to store damaged ships awaiting supplies for repair. Warp factor 1 only when inside the warpwell, otherwise you’ll end up being dragged onto the planet. The warpwell extends out from the planet like this
· One of the best tricks available to you is using the Primary Enemy setting on a cloaker. Say for instance your Resolute has just found a remote enemy base with idle freighters in orbit. As long as you can be fairly well assured that you’ll be able to re-cloak after combat, simply set mission to cloak or super-spy, and Primary Enemy to the race of the ships in orbit. As long as the Resolute remains undamaged after taking out the freighters, it will simply re-cloak without attacking the base. You also won’t have to worry about ships belonging to other races stationed at the base either, as the cloaker will only attack the primary enemy. To ensure success, transfer 1KT of fuel to each enemy ship beforehand in case they are fuelless. Make sure when you do this you either set mission = cloak, with FC not the same as the starbase, or use mission = super-spy, with FC starting with an ‘x’.
· If you find two of your enemies side by side that have reasonably close minefields, but aren’t in a formal alliance, move your ship so that it’s just inside the smaller minefield, and then expand the enemy minefield using friendly code miX so that it overlaps the one belonging to the other enemy. A small investment in torps will yield a big result in minesweeping, and in some circumstances may be enough to initiate conflict.
· When well inside enemy territory, use newly constructed bases to soften up the larger enemy carriers like the Golems and Virgos. These bases have one role only – as sacrificial lambs. Once the base is destroyed, finish the carrier off with a Darkwing the next turn. End result: you get the PBPs for the kill, your enemy gets no PBPs, you strip off large quantities of cash and minerals, and you can simply rebuild the base afterwards. Take note to beam up all your clans except one off the planet just prior to combat.
· Don’t faff-about using your Resolutes to take little outpost border planets when your enemy has been kind enough to build resource-rich planets just a little further in. Remember that as soon as you take a planet, even by ground combat, you’re alerting or updating your enemy to your presence. Therefore you’re best to reserve your element of surprise for a planet that’s at least going to provide some payback for your efforts. Let’s face it, there’s really not a lot of tangible benefit to those outlying single-clan planets that are a large number of light years away from your colonists.
· Early super-spying by your Swifties will give you the friendly codes of enemy planets, and for this tactic to work you really need to be using the Echoview utility. If your enemy for some reason doesn’t change those codes, and isn’t using a global minefield friendly code, any minefields laid in the area will have the same FC as the nearest planet. Any of your ships with the same FC will be able to slip straight through the minefield to the planet, and after that, remain super-spying to determine any FC changes. I used this technique to slip two Resolutes through a Robot minefield to take out the two Cats Paws hiding in orbit. The Robot player worked this trick out, and subsequently changed the planet’s FC. Only trouble for him was, I still had a super-spying Swifty in orbit...
· If you’ve managed to badger to near-death an enemy home cluster, once the player gives up in frustration, quickly tow any of his remaining large warships to a newly erected starbase, making sure you run out of fuel on arrival. Set the FC of the base to the default starting FC for ships of that race (AAA for Feds, BBB for Lizards, EEE for Pirates etc). With any luck, the ship will then surrender to the starbase at the start of the next turn. If this doesn’t work and you get attacked, you’ve (a) lost next to nothing as the starbase is undeveloped, (b) eliminated one of the possible FCs (try using lfm or mkt after this), and (c) been given exact intel on the offensive capabilities of the ship. Odds are he will have left the mission set to kill, or PE set to your race. If you can’t capture the ship, just keep dragging it in the direction of your next enemy and use it as a front ship (your tower to run out of fuel after movement of course)
· When playing against one of the free fighter races, set the FC of your starbases to lfm, and mission to force surrender. This simple technique once bagged me a fully loaded Instrumentality.
· So you’ve just bagged a planet inside enemy territory and he’s got a large warship on the way. Strip the planet of all resources, including your single clan. Depending on the approaching warship, remove either Moly + Tri for carriers (to stop them building fighters), or all of one mineral (to stop them building torpedoes). Then re-cloak, set FC=mkt to reload, and wait. Quite often players will send out warships without any clans onboard, therefore on arrival to take back the planet, no combat takes place, and he’ll quickly move on, allowing you to retake the planet by single clan-drop. If he makes the mistake of coming back with a freighter-load of clans, your single clan with its one defence post will be enough to take out the freighter
· If you don’t have time to beam up your colonist clan as above, set the planet’s FC to either lfm or mkt as appropriate to potentially avoid conflict for one round (this may force him to pause the warship over the planet for an additional turn)
· Found the enemy homeworld with no ships around? Your Resolute won’t be enough to take it down, but as long as the coast is clear, set mission = super-spy with FC = bum for the first few rounds until success, and dmp after that. Once you’ve been caught in the act and decloaked by ion pulse, the potential risk of losing his homeworld will be too great, and is likely to result in the immediate purchase of a number of fighters which are unlikely to see combat in the immediate future.
· When playing against cloaking torp races, set the FC of your starbases to mkt and mission to force surrender. Any cloakers in orbit with the same FC will surrender at the start of the next turn.
· If you happen to find an enemy Merlin or Neutronic refinery ship around a starbase, these make for easy pickings for any reasonably spec’d Darkwing. Capture the Merlin/Neutronic, repair it using locally stolen supplies, and then drive it back into the starbase with mission set to kill and a low value FC, followed up with a Darkwing the same turn. End result, you take out the base and a Merlin/Neutronic for the cost of a few torpedoes. Don’t be too concerned about using the Merlin in this way, as by the time you get up to this stage of the game, it won’t be of much use to you, and you’re unlikely to have many colonists in the vicinity anyway. Just be sure not to have too many torps onboard your Darkwing, as you may end up destroying, rather than capturing the target ship (do the simulations to work out the configuration required).
· If one of your Swifty’s comes across a border-world that has no enemy ships around, too many defence posts and a stack load of cash, simply set mission to superspy, FC to bum, and await payday. If you get de-cloaked, the planet FC will already be set to bum, therefore you won’t get attacked by the planet, and as mission is set to superspy, you won’t surrender to any starbase if present. Also if he changes the FC code on a regular basis, this won’t help him defend against this practice. I once netted over 8000 megacredits with a single Swifty – not bad for a 364mc investment.
· Got a couple of big nasties protecting a starbase? No problem, just use a couple of Resolutes or Deth Speculas to tow them off and run out of fuel the same turn. Just ensure that where they run out of fuel you have an awaiting cloaker to refuel and allow them to re-cloak the next turn. I once did this at a Borg homeworld with a Biocide and Annihilation in residence. A lack of fighters on the Borg homeworld meant that my intended sacrificial lamb (Darkwing with Disruptors, Mark 4’s and Tech 5 engines) actually survived the ensuing combat with the base.
· If you happen to know the FC of a nearby Crystal webmine (via early super-spying of the nearest planet), simply drag off enemy ships deep into the webmine to an awaiting Resolute. You’ll arrange to run out of fuel on arrival at the Resolute, however as you’ve set the FC of your ship to that of the webmine, the webmine won’t drain any fuel nor hinder your movement. Wait a few turns for the enemy ship to be drained of fuel (use Echoview to determine when it’s fuelless), and then tow it off to a nearby starbase. Any approaching Ruby’s are no match for the Resolute, and other Crystal ships can be kept occupied by laying a minefield in the area, or through cloaked-intercept. It would pay to have a second well-fuelled Resolute cloaked over the nearest Crystal planet in case they decide to start changing the FCs on you.
· Keep the enemy ships occupied with annoying tasks. By this I mean having to use heavy warships to take back his own planets, or having to sweep minefields made from resources stolen from his planets, or even just having to sit at a starbase to protect it. Make sure he learns the lesson that he must use the bigger warships for these tasks by taking out his smaller warships with your Resolutes, or the occasional Darkwing when required. Once your enemy knows that sending in that Cobol/Tranquillity/Firecloud will only end in its loss or capture, he’ll loathe sending another one to the same planet for fear of the same thing happening again. He’ll then respond by sending in the big guns in order to take back a planet that has one colonist, no fuel, no cash, and likely very few minerals. Once this behaviour pattern starts, the single colonist planets can be re-taken using Swifties. If he opts to hold the heavy carrier in residence over the planet, this is ideal because if it’s performing baby-sitting duty over the planet, it’s not attacking your starbases. Just go and find another unguarded planet to raid.
· Once you’ve got his bigger ships on defensive duty, the next step is to take him out economically. Remember the birdmen work by guerrilla warfare – this fighting toe-to-toe shear-brute-force attack method is for the other monkeys in the game, not for you. Use the Swifty’s on “point duty” as forward scouts to make sure you’re all clear, and the Resolutes to take those planets without starbases. Strip as much fuel off the planet as you can, and use any supplies, credits and minerals to restock the torps. If you find a planet with an abundance of minerals, either build a starbase (but not when fighting the Lizards or Fascists), or call in another Resolute operating in the area to assist in building torps. Your Resolutes should only need around 50 torps max. Any extra should be used to build minefields deep in enemy territory to keep his warships busy or remove his minefields.
· If you find yourself in a Jupiter game, combine your ships into wolf-packs to take down the starbases. Resolutes work well for this method due to their large cargo capacity, and for extra bite you can use a LDSF or STF (have them arrive fuelless at the starbase, then transfer fuel the next turn to avoid combat and surrender). You’ll need five Resolutes stationed around an enemy starbase, set mission to super-spy and FC to buc (for Beam Up Colonists). Five super-spying ships (use Swifties if you don’t have enough Resolutes) will guarantee the FC change on the planet, which will then beam up and evenly split the colonists on the planet into your ships, i.e. 50% for the planet, 50% spread among the ships in orbit. The next turn, dump the captured colonists back down to the planet, rinse and repeat. If he has heavy warships in orbit, you’ll need to move randomly into the warpwell after each turn, or take them out with Darkwings. As most players will typically have less than a thousand clans on outlying starbases, it only takes a few turns to capture the starbase. Once this is done, it can be secured from attack using the cloaking shield feature of Jupiter. Note when faced with massive Borg colonies, it’s easier to sacrifice a ship to take the starbase out by combat, unless you happen to have a good number of Super Transport Freighters handy.
· One of the nice advantages of super-spy is knowing whether or not a planet can be taken by ground combat or if you’ll need to use a ship to fight it, especially when the enemy has erected a starbase far from its support structure. As Swifties can superspy as well as any other ship, use these instead of Resolutes or Darkwings to determine your initial options.
· Triangulate the positions of hyperjumping probes in space to determine enemy homeworld locations. I did this in one game and knew the homeworld of the Empire by turn 8. By turn thirty the Empire homeworld had fallen in a quick-strike before he had the chance to build a Gorbie. The SSD’s encountered enroute were easily dispatched with.
· Employ “Scorched Earth” tactics after taking over enemy planets – strip them of fuel and resources whenever possible.
· If you’re in a position to take out several of the enemy starbases, and you know the position of the build queue, target the starbase just ahead of the queue position. For instance if your base on planet 150 was the last to build, then the build queue is around this location. If your enemy has a planet 189 for example and you haven’t seen any recent production, this would be a good base to target.
· Where possible, drag two ships belonging to separate enemies to the same point in space or planet, with your ships running out of fuel in the process. If one of them happens to have mission set to KILL, one of the enemy ships will be destroyed, the other potentially weakened. Afterwards, refuel your towers from your cloaked ship and re-cloak them
· Found yourself a freighter at a planet and want to take both out at the same time? Chances are the freighter will move on at the start of the next turn, however if you set your cloaker to tow the freighter 1 to 2 light years into the warp well at warp 9, chances are the freighter won’t break your tow (by having a waypoint greater than 81ly), and you’ll end up with both ships over the planet at the end of the movement phase. Set PE as appropriate and FC to NTP to avoid wasting torps (and capture the freighter of course).
· Got a crippled freighter or small cloaker being chased by an enemy warship with no chance of rescue? Drive it into your nearest planet with mission=colonise, as this mission happens after movement but before combat. If losing the ship is inevitable, you might as well deprive your enemy of either the free freighter or PBPs. Added bonus – it can potentially leave your enemy thinking “What the heck? He just cloaked a freighter? Hang on a minute....”
General tips
Keep in mind that only your Resolute and Darkwing can cloak without burning fuel. They are also the only ships you have that can remain cloaked inside an ion storm, and while cloaked are immune to the effects of the storm. Use this to your advantage
Your main advantage is your cloaking, so use it for all its worth, and once it’s compromised, make evacuating the ship out for repair a high priority
Use Echoview. It’s an essential tool for any Birdman.
Keeping future resource considerations in mind, always try to build the best ship you possibly can. One birdmen guide advises to keep building Swifties throughout the entire game. I tend to disagree with this statement; instead better advice is that after turn twenty build Swifties when no better options exist, and before the build queue rolls back around, use your freighters to truck in the required resources to try and get that base up to building a Resolute at the minimum.
Be aware that superspy comes in two flavours – the one that tries to change the planet FC happens before movement, and the one that just reports the planet FC happens after movement.
One of the main challenges you’ll have playing the Birdmen is fuel. The bulk of your fleet will consist of Darkwings, and those guys are thirsty suckers. Quite often you will find that they charge out of the gates fully tanked ready to deliver mayhem, and get stopped in their tracks rather quickly when going over “dry” regions. To counter this, you’ll need to establish fuel depot planets along the way, and have a few Resolutes around in a support role.
In order to work out how many clans to drop, use the following method
For basic rocks with no natives, the lesser value of either 100 clans or whatever Echoview states under “Max Colonists” after clicking the Popinfo button
For Amorphous planets, whatever Echoview states under “Colonists needed for growth” after clicking the Popinfo button
For Bovinoid planets, the greater value of either Native population divided by 10,000 or whatever Echoview states under “Colonists for max tax income (safe tax)” after clicking the Popinfo button
For all other natives, whatever Echoview states under “Colonists for max tax income (safe tax)”
Invest the time into working out the Randmax player utility. It will quickly pay for itself in terms of reducing the time required to do your turn.
Make sure you know and understand how to manipulate the battle order in your favour by using cloaked-intercept, Primary Enemy, Mission=KILL, Friendly Codes, Towing, and Zero Fuel.
Try to starve the enemy out of ship slots. Bases can continue to be built right up until the final whistle, but the ship slots are where the power resides. Towards the later stages of the game, don’t be afraid to whittle down the enemy warship numbers by having them attack your sacrificial bases, as the bases can be easily rebuilt afterwards, the warships not so much. Got an Automa bearing down on a lone base and single Darkwing? Normally you might think to soften up the Automa with the Darkwing, and then have the base finish it off. However doing it this way means your enemy gets the PBPs for the Darkwing kill, and you end up with none. By using the base to soften up the Automa and then having the Darkwing finish it off, your reverse the situation – PBPs for you, and none for him. It goes without saying, that only use relatively undeveloped bases on the front line with a spare 6000-8000mc for fighters handy for this method of course. As always, make sure you emerge the victor.
While it is possible to steal minerals and supplies from enemy starbases, I tend not to bother as it’s generally more hassle than it’s worth, and requires a good number of ships to do so. If you do wish to steal off starbases, you’ll need 5 cloaked ships to change the friendly code, X number of fuelless ships to beam up & surrender (due to matched FC with starbase), and another X number of towing ships to tow the surrendered fuelless ships off to your local starbase to re-surrender back to you. Note, do not use this method to beam up fuel (for what should be obvious reasons). Unless your starbase is within one turn of his, expect that whatever is stolen will be jettisoned into space before you get to your starbase.
Make sure you keep a handle on the location of the standard build queue, and set starbase FCs to PB1, PB2 as appropriate. Generally speaking, if base 260 has just built using the standard build queue, then construct another Darkwing at that base, and set its FC to PB1. You will want to keep your priority builds just behind the standard build queue, which will give your bases ample time to restock.
Once the ship-limit has been reached and all bases are loaded with either Darkwing or Resolute builds, your home cluster and surrounding territories should shift their primary focus to the production of additional starbases. Generally speaking, priority order should be to build a starbase, then get it producing, build another starbase, then get it producing, and so on.
Battlegroups are something the other races need to worry about, but not you. If you are using a battlegroup to fight more than one ship in the same location in a single round, you’re doing something wrong, or the enemy has you on the back foot (read: you’re also doing something wrong)
Ensure you are fluent with the game mechanics, in particular
· The host processing order
· The towing rules
· How to use Ion storms to your advantage
· The differences between the different host versions
· How friendly codes work
· How add-ons affect and change the game dynamics
Funds are generally going to be fairly tight initially, as the capital outlay to produce a decent Darkwing involves a large investment into starbase tech levels. For this reason it is critical that you plan your first starbases around Ghipsoldal or Humanoid planets, followed by Siliconoid planets, then lastly Amphibian planets.
To avoid decloaking by ion pulse, set the FC on your ships to anything as long as it starts with an “x”. This will allow you to gather the intel without risking detection
As a general rule, only build planet defences when
(a) it looks like you are not going to be able to hold onto the planet, or
(b) there is a risk of a starbase being taken by ground combat, or
(c) to fend off probes when a warship is not available (max 25)
Watch Out For Bad Advice
Unfortunately some other Birdman guides out there are either based on outdated versions of Host, or contain some degree of nonsense. Here’s some to watch out for:
An alternative guide to the birdmen advises “you should engage enemy vessels (other than cargos) only when *absolutely* necessary”. Frankly this is rubbish. You should engage any enemy ship anytime you think you can get away with it i.e. survive the combat and get back to a cloaked state immediately, or by repairing before the enemy has a chance to counter-attack.
The same guide advises “You'll be very tempted to build Large Freighters to move your people quicker - AVOID THIS TEMPTATION”. Once again this is complete drivel. You must at all times be thinking about the three E’s of playing the Birdmen - Economy, Economy & Economy, and relying on your cloakers to expand your home cluster is a recipe for economic disaster.
Another guide advises “Don't build Swifties after turn 10, unless they are for carrying cash”. You’ll find that some newly created Ghipsoldal starbases will only be able to push out a Swifty due to a lack of tech levels, minerals or cash. You definitely *should* build a Swifty when this is the case, as they are much more than just a mere scout. After all, look at the alternatives. You’re going to build a Transwarp small deep space freighter instead? Yeah right.
The same guide advises “Do get any ally and get a nice big ship off them as soon as possible, pay for it if you have to. Once you have it you can then clone it - then stab them in the back”. This is just plain wrong on so many levels. First up, you should be selective about who you ally with, rather than getting into an alliance with any old race, or player for that matter. Secondly, at the start of the game you should be putting any profits you make back into your economy (building factories, mines etc), not running off and buying a large warship you can ill-afford, and frankly don’t need (not to mention it’s going to be horribly expensive to clone). Third, please tell me he’s joking about the backstabbing....
Another piece of dubious advise reads “Swifties are good scouts at the start of the game but quite soon you will be wondering why you built them. There lack of fuel, ability to hold almost nothing and..... .......the Resolutes and Darkwings don't need fuel to cloak so they can sit in enemy territory for as long as you want, the Swifties cannot”. Actually for their size, the Swifties have a good sized fuel tank and are quite capable of remaining cloaked well behind enemy lines beyond twenty turns at a time. In my current game, the Swifties comprise ten percent of my fleet of 122, and at turn 60, they are all being kept busy with various tasks, unlike the thirty-odd Darkwings that are just milling around my homeworld cluster with nothing much to do.
Lastly, one guide advises “Don't use any non-cloaking ships”. C’mon, seriously? You’re telling me no freighters, no Merlins, no Neutronic refineries or carriers, and no Valiant Winds? Using only cloaking ships is a big no-no. Your best cloaking ship for cargo capacity is the Resolute, however you’d need five of these to match the capacity of a single LDSF, and it makes no sense to send five ships when one ship will suffice. Also in a mineral-poor game you will need those Merlins and Neutronic ships, otherwise you’ll find your starbases remain idle while waiting for those Resolutes on freighting duty to return with the much needed resources. Some guides place far too much emphasis on the “you-must-stay-cloaked” side of things, which will only hinder your development. Stay hidden as best as you can for the first five turns, longer if convenient, but rest assured it’s only going to be a matter of time before your neighbours work out where you are.
The Other Races
When it comes to the other races, the Birdmen have no natural enemies, and in spite of the shortfalls, can tend to handle themselves well regardless of the situation. In fact in one game I was playing as the mighty Lizards and came across the Birdmen as a neighbour. So naturally I presumed taking them out would be a piece of cake, right? I spent the rest of that game trying to make gains into Birdman territory, and failed to properly capitalise on the fact that another neighbour had quit the game. End result: I didn’t get very far.
When it comes to the initial stages of the game, a decision will need to be made in terms of a direction for expansion, and this will inevitably involve moving into disputed territory. In the overview of the races below, I’ve put in an attack/alliance scale to determine whether to attack (higher values) or to make an alliance (lower values). In most games you’ll find you’ve got two neighbours, one of which you should attack, and the other setup a border with. The neighbour with the higher attack/alliance value should be targeted, with the lower valued neighbour allied with. Of course, other factors such as past encounters or alliances, and relative skill level of the neighbouring race should also definitely be factored in.
The Feds: Other than their super-refit, the Feds have little on offer that you can use, however they will definitely be interested in your cloakers. If you decide not to attack them, you should be able to trade a Swifty for a Bohemian, which makes for a worthwhile trade for both sides. They may try to push for a Falcon or Fearless – just ignore this behaviour, as they need a cloaker far more than you need a terraformer. Their economic advantage coupled with a good array of mid-ranged ships will make an early quick-strike challenging, and potentially draw out a few battles into a full-on campaign, thus making you potentially vulnerable to Fed allies. On the attack/alliance scale I rate them a 6.
The Lizards: The Lizards T-Rex is no match for your Darkwings, and at worst you’ll trade 1-1 with the Madonzillas, although it will cost him dearly to load the carrier, and therefore you’re more likely to encounter the Rex instead. For its size, the Lizard Class Cruiser tends to be thirsty on the fuel, which means it has a somewhat limited range before requiring a fuel stop. However the Lizards fearsome ground attack and economic advantages tend to favour an alliance rather than attacking. Neither side has much to offer the other – you’re not about to give up your Darkwings, and the only ship in the lizard fleet that is of potential use to you is the Loki for use against the Pirates or Fascists, but not that you need it. On the attack/alliance scale I rate them a 5.
The Fascists: The Fascists are another cloaking torp race like yourself, so again there’s not much on offer in forming an alliance, with the exception perhaps of clearing amorphous natives from planets. Their ground attack ratio, while not as strong as the Lizards, is still potentially painful, however overall the Fascists have more to fear from the Birdmen than the other way around. On the attack/alliance scale I rate them a 7.
The Privateers: You’re bad news for these guys, and the smart Pirate will try to ally with you as early as possible. They’ll be after your Resolute for its fuel tank capacity, and you’ll be after a Gravitronic-equipped ship in exchange, however you should be able to bag a few via combat if negotiations go south. A bird-priv alliance can potentially be nasty – you take out the Loki’s and the webs, while they take out the larger ships you’d rather not fight. Overall the decision on the Pirates will ultimately come down to the reputation and experience of the other player. On the attack/alliance scale I rate them anywhere from an 8 for inexperienced pirates to a 3 for pirate masters.
The Borg: In the first half of the game, the Birds are a nightmare for the undeveloped Borg, however if they’re allowed to survive into the later game, their sheer numbers, economy and firepower will prove difficult to stop. In one game I played as the Birds, by turn 50 the Borg were reduced to one starbase, a couple of cubes and perhaps 3 planets. In another game, the large distances between homeworlds gave the Borg all the head-start they needed to become unstoppable. Overall in the early stages I’d generally tend to favour attacking over an alliance, and therefore on the attack/alliance scale rate these guys an 8.
The Crystals: Let’s face it, those webmines can be trouble, and the lower sweep rate for webs can make for slow progress. When combined with your cloaking abilities, a Crystal-Bird alliance can be devastating. By partnering together, the benefits gained certainly outweigh the advantages of attacking, and the Crystals don’t need a rocket scientist playing them to be effective. If only a NAP is on offer, you’ve effectively handed over any webmine problems to some other player. Regardless of whether a NAP or an alliance is on offer, the Crystals rate a solid 3 on the attack/alliance scale.
The Evil Empire: The Empire makes for an interesting, and yet highly complementary alliance with the Birdmen. Your forward scouting parties can give advanced warning of enemy warships, allowing early interception and elimination of potential threats to the vulnerable Super Star Destroyers. If only a NAP agreement is in place, just be sure to keep a watchful eye on the score table as the game progresses, as you might find your back yard is not as well secure as you had hoped. Due to the unique capabilities of both races, the Empire rates a 4 on the attack/alliance scale.
The Robots: Four times minefield capability, free fighters, and the ability to slap together a couple of Instrumentalities out of spare change make the Robot potentially the worst enemy for the Birds. He’ll be after your Resolutes to replace his vulnerable Cats Paws, and you’ll just want him to pick on someone else. Due to the inherent difficulties of taking out the Robot quickly, an alliance is usually the preferred option here, giving these guys a 4 on the attack/alliance scale.
The Rebels: The rebels make for a fairly bland partnership, with their Falcon and free fighters being the only tangible assets on the table for the Birds. Much like the Feds, you could go either way on these guys, the main consideration being who’s on your other border, rather than the Rebels in particular. With no natural defences against the Birds, the Rebels rate a 6 on the attack/alliance scale.
The Colonies: Similar to the Rebels, however the Colonies’ fighter minesweeping and free fuel from the Cobols tends to make them more favourable as an alliance partner, especially considering the fuel-hogs that are the Darkwings. On the attack/alliance scale, these guys are a 5.
The Ships
A quick review of the birdmen fleet reveals a predominantly torpedo-based race with a good array of mid-level ships, and the only cloaking battleship in the game. Thankfully the ships worth building have all got a decent crew count and therefore the risk of having one captured in battle is negligible. As with all the races, there are some ships which can be considered essential, and others that are best avoided. Here’s a run-down on the main ones you should build:
Swift Heart Scout:
Confucius say “Do not use a cannon to kill a mosquito”, and in the Echo cluster, the Swifties are the proverbial mosquitoes. I once had a game where a heavily equipped Golem was kept busy retaking planets that were then being taken back by a couple of Swift Heart scouts. This freed up the Darkwings and Resolutes to do what they do best of course. You should aim to build these whenever mineral or resource constraints limit the construction of other ships, however keep in mind that the Swifty really needs to have the higher tech engines for it to be useful (use Transwarps whenever possible). Considering these are normally built due to limited resources, it’s typical to find them equipped with x-ray lasers which are perfect for stealing LDSFs and taking planets with zero defence posts. However where possible, try to fit them out with higher spec’d beams, as they are unable to take down Lizard planets with x-rays. While they’re vulnerable in minefields, and not intended for any combat involving an exchange of firepower, they are in actual fact a highly versatile ship in the birdman fleet. Use them initially to provide recon information on your neighbours, and capture unescorted freighters & probes – considering the typical probe crew count versus the 126 crew on the Swifty, they actually perform very well in this function when fitted with Disruptors. Mid-game, they can deliver stolen credits back to starbases, store stolen credits for later use by the minelayers, take undefended planets, trigger Fascist poppers, provide forward reconnaissance, detect minefields, be sacrificed to establish base / warship defences, act as external fuel tanks for Darkwings, clan-drop, alter/detect planet friendly codes, act as bait for a trap, steal fuel or money, provide a distraction by uncloaking deep behind the front line, and generally annoy the hell out of the enemy. Most importantly however, they perform the basic tasks that allow you to free up your bigger ships for more intensive duties.
White Falcon and Fearless Class Cruisers:
Should be built when mineral, cash, or tech levels prohibit the production of the Resolute. While not as combat-effective as the Deth Specula, there is definite merit in building a decently spec’d White Falcon or Fearless over a diluted Deth Specula. Both ships have excellent fuel tanks, appreciable cargo capacity, relatively low mass, a single torp tube, and two engines. This combination makes them ideal for capturing freighters/scouts/probes, and raiding the relatively unprotected outer-rim planets where they’re unlikely to encounter enemy warships or minefields. Resources gained can be efficiently turned into torpedoes for future conflicts, or deployment of minefields. Due to the typical roles these ships will perform, it’s best to fit them with Disruptors (for capturing freighters), and a Mark 7 torpedo tube (to make better use of the cargo space when laying minefields).
Deth Specula Class Frigate:
While on paper the Deth Specula Frigate may seem to be a weapon of choice due to its 6 beams and 4 torps, the lack of cargo space, ship mass and fuel tank capacity tend to significantly hinder the usability of this ship. However this ship really comes into its own when you’re faced with insufficient Duranium for a Resolute, as the Deth Specula with X-ray lasers and Mark 7’s makes for a viable option. The combination of the small fuel tank, and the fact that you can pretty much write these off after a single minehit tend to make them more suited for the defensive rather than the offensive. Roles for this ship include raiding freighters and scouts, protecting captured planets from cloaked raiders, and to reduce the fighter count of starbases or mid-sized carriers prior to sending in the Darkwings. Due to its small cargo capacity, when operating deep in enemy territory the Deth Specula should normally have a support ship like the Resolute in the region to restock torpedoes or to tow-evacuate to a nearby starbase for repairs.
Large Deep Space Freighter:
The Birdman’s freighter of choice – equip them with Transwarps and keep them initially hidden by planet hopping where possible within the first 15 turns.
Resolute Class Battlecruiser:
The Resolute is the workhorse of the Birdman fleet and any good Birdman player will ensure they have a good number of these built before the build queue limit is reached. It’s arguably the most versatile multi-role ship in the game, and should be used either on their own or as a background support ship for the Darkwings or Deth Specula’s. The large tank capacity, plus the zero-fuel cloak means these ships become a nightmare once established behind enemy lines, quickly converting mineral and cash stockpiles from captured planets into sizeable minefields thanks to the large cargo hold. Considering that Molybdenum will generally be in short supply around homeworld clusters, equip your Resolutes with Disruptors and Mark 4’s, or Mark 7’s where feasible. An upgrade to the Mark 7’s starts to pay dividends when building minefields around captured enemy planets, which you may not be able to hold for long. Considering the Resolute is an opportunistic predator, and typically is at home deep inside enemy lines, where possible aim to equip it with the highest spec beam weapons you can afford (for minesweeping) – even if this means putting lower spec beams on a later Darkwing. Lastly, try to avoid using this ship purely for scouting missions which can be done by a White Falcon or Swifty instead, rather it should be used to destroy the enemy’s economy.
Darkwing Class Battlecruiser:
What the Birdmen race lacks in economic benefits, the Darkwing makes up for in terms of tipping the scales in the Birdman’s favour. The Darkwing is arguably one of the best ships in the game, if not the best. Like the Resolute, the Darkwing is able to remain cloaked without burning fuel, thus they can remain dormant for any number of turns as a “sleeper cell”, activating as required to take out passing ships, then returning to their dormant state. With or without the engine shield bonus, you should aim to build as many of these as you can, keeping in mind that even a Darkwing with tech 1 engines, x-rays and Mark 4’s will perform just as well as a top-spec’d Darkwing when used as a sacrificial lamb against a large carrier with around 80 fighters. Due to the requirement of Molybdenum, a typical Darkwing armament should include Disruptors (to keep Moly requirements down), Transwarps, and Mark 7’s, with higher spec’d beams implemented when Moly is in abundance. The only down-side to the Darkwing is that for this size ship, it could really use a fuel tank with a much higher capacity, therefore ensure you bring along a few Resolutes to extend their range.
Merlin Class Alchemy Ship:
Unless you’re in a mineral-rich game, this ship should be one of your highest priorities at the start of the game. Building a Merlin as soon as possible will pay for itself ten-fold in the first 50 turns, and can be the difference between first place and middle of the pack. Use your Swifties to scout out the fattest Bovinoid planet in your immediate area, and use one of your LDSFs to tow the Merlin to it. Once in place, it won’t be moving anytime soon, so sacrifice engine tech for better beam tech to protect against probes or cloaked scouts.
Neutronic Refinery Ship and Neutronic Fuel carrier:
Build as required.
The Other Ships
Small deep space freighter – Only build at tech 1 starbases in order to recycle for a PBP the next turn
Small transport – It doesn’t have the cargo capacity, cloaking or the combat ability to make it worth building
Medium Deep Space Freighter – For the cargo space on offer, you’re better off building a Fearless or White Falcon instead, at least that way you’ll have the benefit of cloaking, plus the potential to opportunistically raid enemy LDSFs. If minerals are light on the ground, build a Swifty instead.
Super Transport Freighter – For the expenditure, you’re generally better served by having two large deep space freighters instead of the STF. Definitely build a few of these in mineral-rich games however.
Skyfire Class Cruiser – Never build this ship unless there is an add-on which enhances its capabilities, like Jupiter for example. When playing in a Jupiter game, don’t build any more than 2-3.
Bright Heart Class Destroyer – Low fuel, cargo and crew mean there are better options in the Birdman fleet than the Bright Heart. In the same vein as the Skyfire, never build this ship unless playing in a game that gives it additional capabilities. Some guides say this ship makes an excellent torpedo battery, however in a single ship versus single ship fight, why not just send in a Resolute instead? If used as a sacrificial lamb, it’ll get toasted by any decent carrier long before it can launch any torps, and with only two beams, will knock out as many fighters as a Swifty. Against a torp ship that the Darkwing can’t handle on its own, it’ll be lucky to get four torps away before it’s destroyed.
Red Wind Class Carrier – In standard games, the only role for this ship is to transport fighters from your rear bases to the front line, which if you’re doing things right, shouldn’t be required in the first place. However, definitely build a few of these when playing in a Jupiter game, as they can parasitically feed off the large enemy carriers while remaining cloaked, stealing fighters for your newly built bases on the front line.
Valiant Wind Class Carrier – As a general rule, these aren’t worth the expenditure, due to the cost of building the fighters. To soften up larger carriers, a Darkwing with x-rays, tech 1 engines and mark 4’s or 7’s is both more effective, and less expensive to fully equip. However when allied with one of the free fighter races, this ship should be built with low-spec engines and used to soften up the larger warships.
Bottom Line
Eagles may soar, but weasels don’t get sucked into jet engines. Be the weasel.